How To Download & Use Your SolidPoint Geomatic Structural Survey
A practical, visual guide to your SolidPoint survey link, written for first‐time viewers and experienced CAD / BIM users.
Questions about your files? Call 01332 898350 or email projects@solidpoint.co.uk
Written by: S. Cavanagh - Revit Technician
Published 21st September 2026
The short version
Use the PDF for straightforward review, the DWG for CAD work, the RVT for Revit / BIM work, and the point cloud when you need to inspect the captured structural information in greater detail.
In This Guide
What You've Received
Your Survey Pack
Your structural measured survey is normally delivered through a SolidPoint Sync link. The exact combination of files depends on the agreed scope, but the deliverables are designed to work together and can be supplied as a standalone structural survey or alongside a measured building survey.
| Deliverable | File Type | Use It For... |
| 2D Structural Measured Survey | PDF + DWG | Reviewing structural drawings or working in CAD |
| 3D Structural Revit / BIM Survey | RVT | Revit design, coordination and BIM workflows |
| Unified Point Cloud | RCP / RCS in ZIP | Scan level reference and checking |
| Reality Capture Viewer | LGSX | Navigating scan positions / bubble views |
Important Note - They are not separate surveys
The 2D structural survey, 3D Revit/BIM survey and point‐cloud data all relate back to the same measured survey. They are different ways of using the same captured information.
2D Structural Measured Survey
example_project.pdf • example_project.dwg
A drawing package supplied as PDF and/or DWG. Depending on scope, this can include structural plans, sections, elevations, details, dimensions, callouts and other agreed survey sheets.
3D Structural Revit / BIM Survey
example_project.rvt
A BIM‐ready Revit (RVT) model representing the surveyed existing structural information. Structural elements are modelled using Revit structural categories where possible, with the level of detail following the agreed survey scope.
Combined 2D + 3D Structural Survey
The PDF/DWG drawing package and RVT model are coordinated from the same measured survey, so the 2D and 3D information can be used together.
Important Note - BIM‐ready does not mean engineering design‐ready
The Revit model is a structured representation of the surveyed existing condition. It is not structural engineering design or calculations. The exact content and modelling level follow the agreed survey scope.
Download Your Files From Sync
How To Download Your Survey
SolidPoint Sync is the online delivery area used to issue your survey. You can view the folders online and download individual files or folders to your computer.
Download Steps
- Open the SolidPoint Sync link supplied by SolidPoint.
- Open the folder for the deliverable you need.
- Use the download control or the file's Actions menu to download the item.
- For point cloud data, download the ZIP and extract it fully before using the RCP / RCS data.
Click image to maximise
Your Sync Project Folder
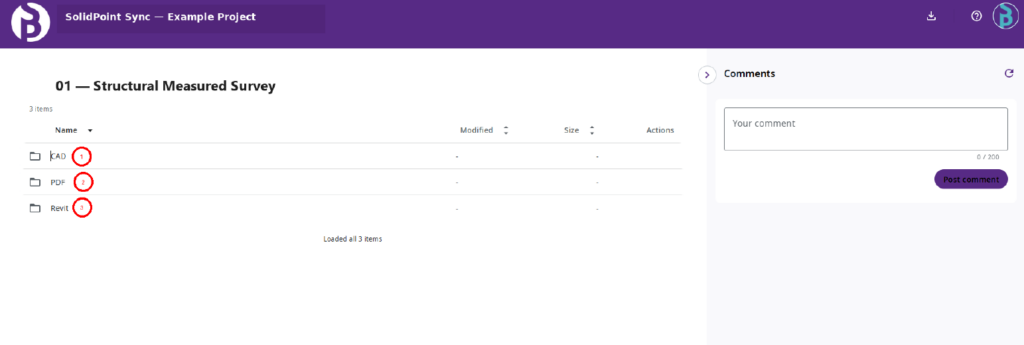
Folders Inside The Survey Pack
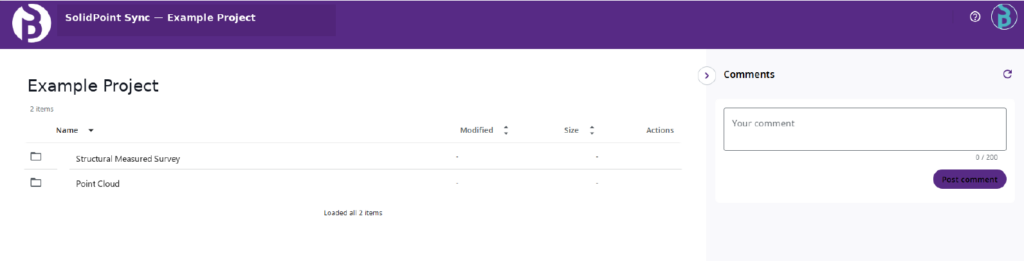
What Each File Is For
File Types
Filenames vary by job - this guide uses example_project plus the file type. The red box marks the example file name in each Sync folder.
CAD
Editable 2D CAD drawings.
Use these for structural plans, sections, elevations, details, dimensions and CAD‐based coordination where included in the agreed scope.

The easiest format for most people to review, print or share. It contains the supplied structural survey drawing sheets in a ready‐to‐read format.

Revit
The 3D BIM‐ready Revit model.
Structural elements are modelled using Revit structural categories where possible, making the model suitable for Revit‐based design and coordination workflows.

Unified Point Cloud
example_project.zip • .rcp / .rcs
Scan‐level reference. Download the ZIP, extract it fully, and keep the RCP with its supporting RCS files.
Reality Capture Viewer
example_project.lgsx
A navigable scan project for moving between scan positions and panoramic bubble views.
Important Note - BIM‐ready does not mean engineering design‐ready
The Revit model is a structured record of the surveyed existing condition. It is not structural engineering design or calculations. Content and modelling level follow the agreed survey scope.
Software To View Your Survey
Which Software Should You Use?
You do not need every programme below. Pick the software that matches the file you need to open or work with.
If you only need to review the survey, start with example_project.pdf.
Autodesk Viewer
Browser‐based viewing of many 2D and 3D formats, including DWG and RVT.
Useful if you only need to review a file.
Adobe Acrobat / Any PDF Viewer
The simplest way to review, print and share example_project.pdf. Most browsers can also open PDFs directly.
AutoCAD
Full CAD application for editing and working with example_project.dwg.
Autodesk Revit
Used to open, coordinate and work with the BIM‐ready structural model and linked point cloud.
Autodesk ReCap Pro
Used for viewing and working with point‐cloud / reality capture data such as example_project.rcp and .rcs.
Leica TruView Desktop
A compatible viewer for Leica reality capture projects such as example_project.lgsx.
Useful for navigating scan positions and panoramic views.
FAQ - Do I need paid software?
Not always. If you only need to review example_project.pdf or view many DWG / RVT files, Autodesk Viewer can be a useful starting point.
Full editing and BIM workflows require the relevant desktop software and licensing.
How To Read The Drawings
How To Read & Understand The Survey Sheets
example_project.pdf is normally the easiest place to start.
A structural measured survey records columns, beams, openings, bolts, plates, connections, bracing, roof structure and other visible structural elements within the agreed scope.
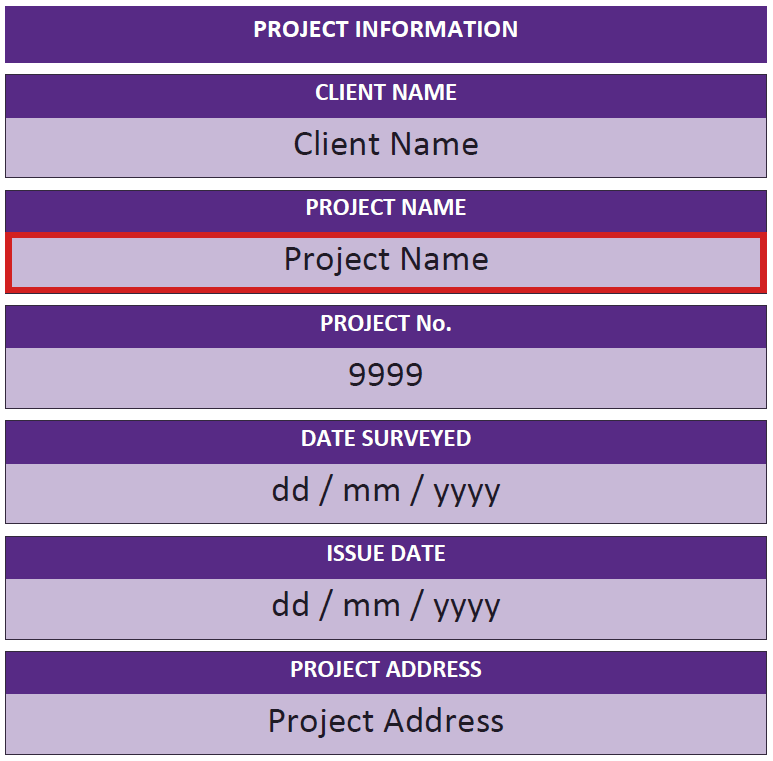
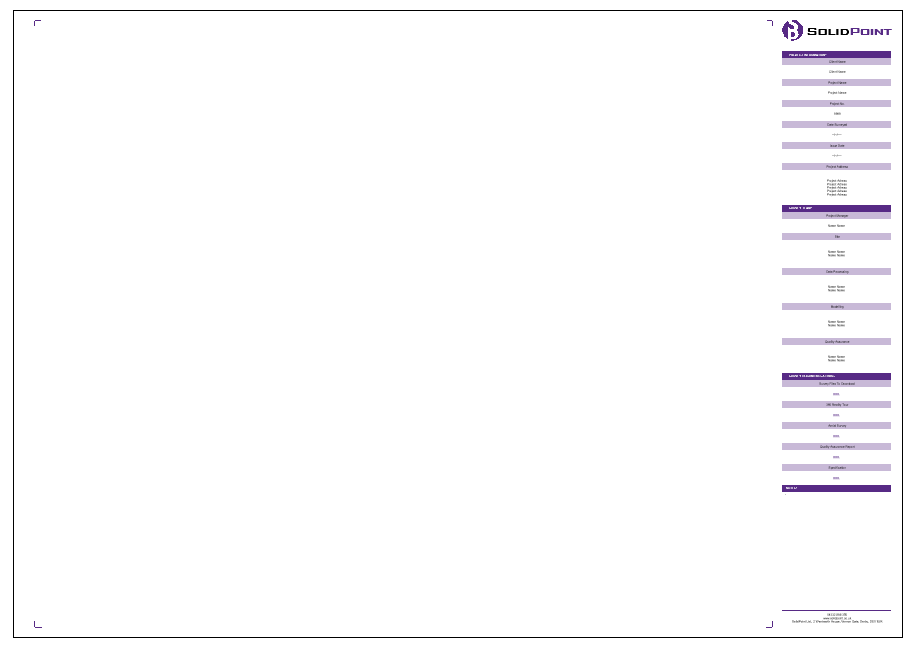
The Cover / Information Sheet
The first sheet normally contains project and survey information. Depending on the job, this can include:
-
- The client
- Project reference
- Survey date
- Issue date
- Survey team
- Datum
- Grid
- Revision
- Links to additional survey information.
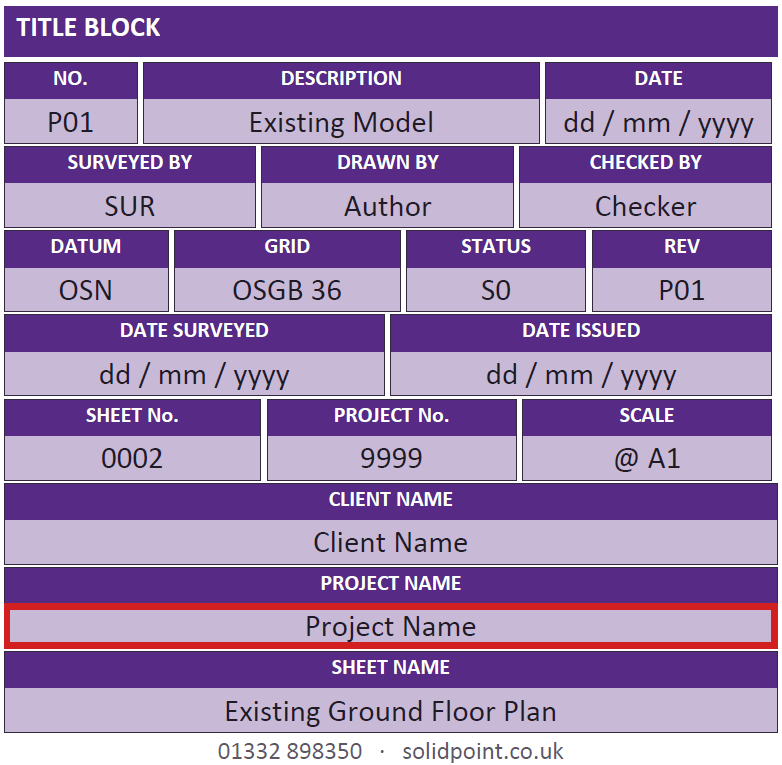
Title Block
Identifies:
-
- Sheet number
- Project number
- Scale
- Revision/status
- Survey/drawing/checking information
- Datum/grid
- Sheet name
Plans, Sections & Details
Structural plans show the position and arrangement of structural elements. Sections and elevations explain heights, relationships and member locations.
Use dimensions, notes, tags and the legend together rather than relying on linework alone.
TIP - Use the drawing scale carefully
Use figured dimensions wherever they are provided.
If you print a drawing, check the scale bar after printing rather than assuming the PDF is still at its original scale.
The Key To The Drawing
The legend explains abbreviations, symbols, linework and hatching. Structural projects use the same SolidPoint drawing conventions, but project‐specific callouts or notes may also be included.
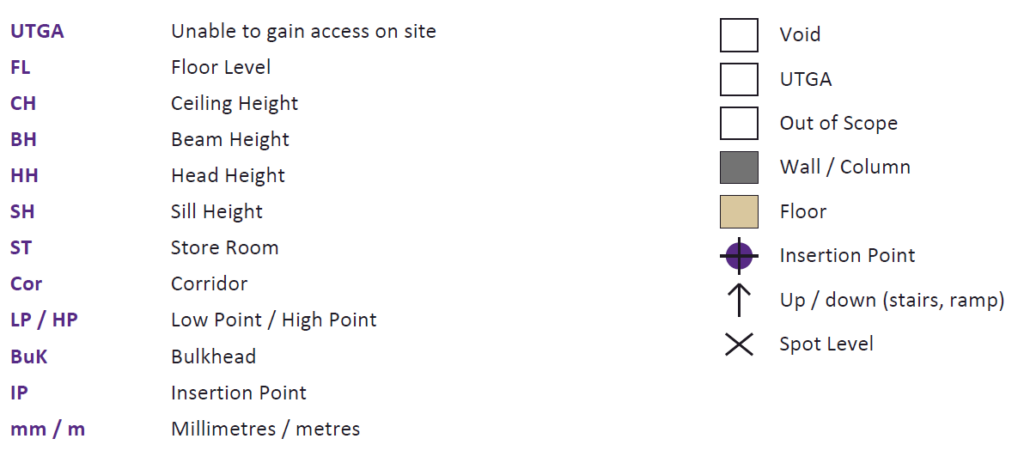
Beam
Horizontal structural member
Bolt
Surveyed bolt / fixing information where captured
Bracing
Structural bracing member
Column
Vertical structural member
Connection
Connection arrangement captured during the survey
Opening
Structural or building opening captured in the survey
Plate
Structural connection or fixing plate
Roof Structure
Rafters, purlins, trusses or other roof members where captured
Other Drawing Information
-
- Callouts and tags may identify structural members, openings, connections or other surveyed features.
- Hatching and linework can distinguish different elements. Always check the legend on your own survey.
- Spot levels, insertion points and other survey symbols may be shown where relevant.
- If photographs or annotated images are included, use them alongside the drawing callouts and notes.
What The Finished Survey Sheets Can Look Like
These examples show the presentation style and information areas used on SolidPoint survey sheets.
Structural survey sheets can vary by project and may include plans, sections, elevations, details, callouts and other agreed information.
Project names, client information and project‐specific values in examples should not be used as values for your own project.
Example Survey Title Sheet
Example Survey Sheet
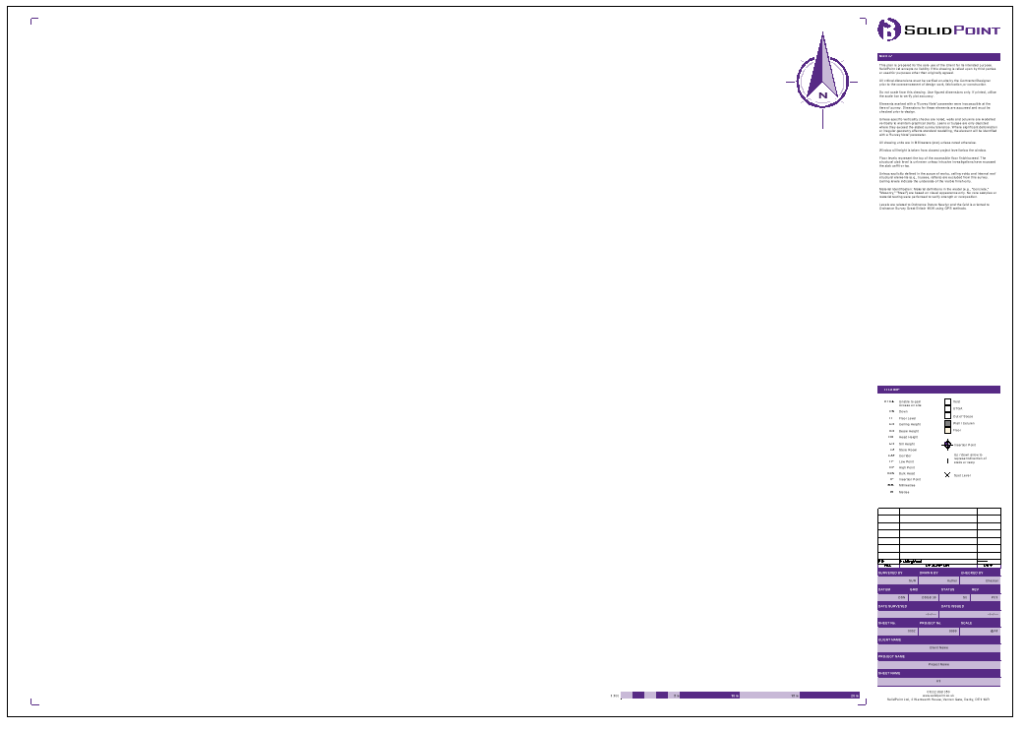
Do not use the example levels, sheet numbers, dates, scales or project fields as values for your own building.
Always work from the drawings issued for your job.
Important Note - Example values are not your project values
Do not use the example levels, sheet numbers, dates, scales, member sizes or project fields as values for your own building. Always work from the drawings issued for your job.
Point Cloud & Revit
Using The Unified Point Cloud Data
If your package includes point‐cloud data, Sync will normally contain example_project.zip. You may also receive example_project.lgsx, which provides a more visual way to navigate the captured scan positions.
Download Steps
Step 1 - Download example_project.zip from the Point Cloud folder in Sync.
Step 2 - Extract the ZIP completely on your computer - do not work from inside the ZIP.
Step 3 - Keep example_project.rcp and its supporting .rcs files together in the extracted folder structure.
Step 4 - Do not move individual .rcs files away from example_project.rcp.
Step 5 - Open example_project.rcp in Autodesk ReCap, or link it into Revit as required.
example_project.lgsx - The Navigable Scan Project
This is a Leica reality‐capture project. It is useful when you want to move between scan positions and inspect the panoramic bubble views and captured environment. A compatible Leica viewer such as TruView Desktop can be used to access LGSx projects.
Download TruView Desktop from the Leica Geosystems website.
FAQ - Why is it zipped?
A point cloud can contain many supporting files and can be very large. example_project.zip keeps the complete dataset together for download and transfer.
Reloading The Point Cloud After Download
If you have received the BIM‐ready Revit model and the point cloud, you may need to tell Revit where example_project.rcp is stored on your computer. The most common case is when the model was created on another computer and the point cloud has been downloaded to a new location.
Step 1
Open the supplied example_project.rvt model in Revit.
Step 2
Go to the 'Manage' tab and select 'Manage Links'

Click image to maximise
Step 3
Select the 'Point Clouds' category, then the point cloud entry (example_project.rcp)
Choose 'Reload From...'
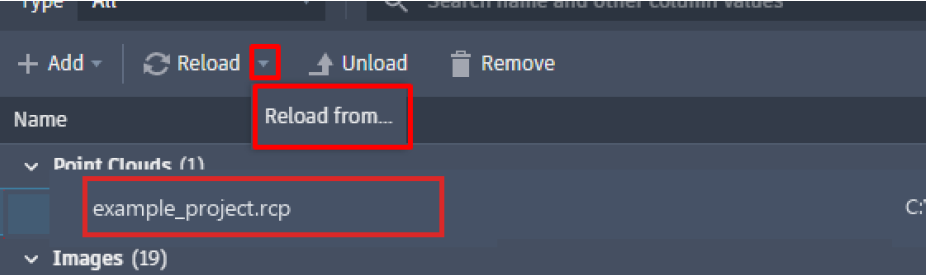
Click image to maximise
Step 4
Browse to the extracted example_project.rcp file on your computer.
Step 5
Reload the file and confirm the point cloud appears in the expected position.
TIP - Do not manually move the point cloud to make it fit
If the point cloud appears in the wrong location, stop and check the intended coordinate/origin workflow first. Moving it manually can break coordination with the survey and other project information.
Keeping the Survey In The Right Place
The supplied Revit model will usually be positioned using GPS / survey coordinates unless another arrangement has been agreed. The exact datum, grid and coordinate information should always be taken from your own survey sheets.
Origin to Origin
Where the point cloud and Revit project have been prepared to use the same origin relationship, Revit can use an Origin to Origin placement workflow. This is intended to keep the survey information aligned without manually moving the point cloud.
Shared Coordinates
Some projects use a shared‐coordinate system rather than a simple origin‐to‐origin relationship. If your project uses shared coordinates, follow the coordinate setup agreed by your project team and the information stated on the survey.
If You're Unsure
Do not guess the coordinate system. Check the survey cover/title block and notes, then confirm the intended setup with the person responsible for your Revit project before repositioning linked survey data.
If You Move The Files
If the RVT model or point cloud is moved to another computer or folder, Revit may report a missing link. This does not necessarily mean the data is damaged - it may simply need the file path updating using:
Manage → Manage Links → Point Clouds → Reload From.
Important Things After Handover
Important Things To Know
A structural measured survey records the structural information captured within the agreed survey scope. The survey can only represent what was captured during the survey. Read the survey notes as well as the drawing; they explain assumptions, annotations and survey information.
What The Survey Confirms
-
- It records the structural information captured within the agreed survey scope.
- The 2D, 3D and point‐cloud deliverables are different ways of using the same captured information.
- Drawing units are normally millimetres unless stated otherwise.
- Levels and dimensions should be interpreted using the drawing notes, legend and title block.
What It Does Not Confirm
-
- It is not structural engineering design or calculations, even when example_project.rvt is included, unless those services have been separately commissioned.
- Critical dimensions and structural information should be checked on site before design, fabrication or construction where required.
- Elements that were inaccessible or concealed cannot be confirmed unless they were otherwise captured or established within the agreed scope.
- The presence, absence or exact construction of concealed structure should not be assumed from the model or drawing where it was not captured.
- Material descriptions and structural element identification are based on the information captured; engineering verification is not implied unless separately agreed.
If You Issue The Model To Another Consultant
Pass on the relevant RVT and point cloud data together when the recipient needs to inspect the survey in 3D. Keep the extracted point cloud folder structure intact. If the recipient only needs the drawings, the PDF and/or DWG may be sufficient.
Common Questions & Queries
The point cloud won't open
Make sure example_project.zip has been completely extracted. Keep example_project.rcp and supporting .rcs files together. Do not try to work directly from inside the ZIP.
The point cloud is in the wrong place
Do not move it manually. Check whether the project should use Origin to Origin or shared coordinates and confirm the intended coordinate system.
The point cloud is missing in Revit
Go to Manage → Manage Links → Point Clouds and check the saved path. If the files have moved, use Reload From and choose example_project.rcp.
I need to look at the drawings
Use example_project.pdf. It is normally the simplest format for reviewing and sharing the structural survey.
I need to look at the DWG but do not have AutoCAD
Try Autodesk Viewer or another DWG viewer. Autodesk Viewer supports DWG and many other 2D / 3D formats.
I need to inspect the Revit model but do not have Revit
Try Autodesk Viewer for browser‐based RVT viewing. Autodesk Viewer supports RVT as well as many other 2D and 3D formats.
I need to view the LGSx
Use a compatible Leica viewer such as TruView Desktop. TruView Desktop supports LGSx projects.
A structural dimension or member size looks wrong
Check the legend and notes first. Critical information should be verified on site before design, fabrication or construction where required.
Need Help?
The 60-Second Version
Use this page as a reminder after handover. If you are unsure which file to use, how the coordinate system should be handled, or how to link the point cloud, contact SolidPoint before changing the survey position or file structure.
01
Open your SolidPoint Sync link and find the folder for the deliverable you need.
02
Choose the right format:
PDF = review
DWG = CAD
RVT = Revit/BIM ∙ RCP/RCS = point cloud
LGSx = scan navigation
03
For point clouds, extract example_project.zip completely and keep the RCP and RCS files together in their original folder structure.
04
For Revit, if the point cloud is missing, use Manage → Manage Links → Point Clouds → Reload From.
05
Read the notes and legend. They explain abbreviations, symbols, units, callouts and important survey information.
06
Always check critical dimensions and structural information on site before design, fabrication or construction where required.
Use The Structural Survey With Confidence
Your structural measured survey is intended to provide a clear record of the structural information captured during the survey. The different deliverables give you different ways to use that same information - from straightforward PDF review through to CAD, BIM and scan level inspection.
Final Reminder
Always read the drawing notes and legend, use figured dimensions rather than scaling, keep point cloud files together, and verify critical information before design, fabrication or construction.
Stay updated with us:
How Can SolidPoint Help Your Project?
At SolidPoint, we are passionate about providing accurate and efficiently collected data for our clients and have worked on numerous projects across the UK. If you are looking to commission a survey in your next project, please don’t hesitate to Get in touch with a member of our friendly team to discuss your requirements and get a free quote.
Alternatively, you can call us on 01332 898350 or email us at projects@solidpoint.co.uk for more information on our services. We look forward to hearing from you!
Give us a call on
Request a Free Quote






Trusted Suppliers for: